Thursday, January 27, 2011

Dry Weather Road


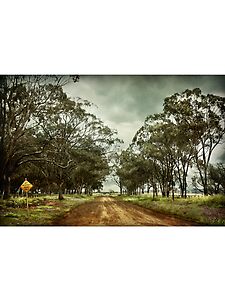
This is a road not too far from my home.

Hours after I shot this the sky clouded over and down came the rains that cut this road, drenched us solidly for a month and culminated in the destructive force of the Toowoomba floods.

Never in 185 yrs has Toowoomba experienced such a thing. Certainly no-one expected it. Why would we? We’re situated at the top of the Great Dividing range, on the top of an escarpment, with beautiful views to the valley below. Why would it flood up here?
But flood it did, and sadly the massive destruction that we experienced up here was just the beginning. Floodwaters raged down into the valley, destroying all in it’s path, giving little or no warning to most….

I live in a beautiful place. Our region is well known for it’s beauty and the fertility of the land.
I hope in time to come the people of Toowoomba, the Darling Downs & Lockyer valley will remember the beauty of this place. Remember what it is that makes us live here & love it so much.

For me it’s scenes like this. I love the trees & the dust. Love that a road might only be accessible in the dry, that I have to stop to let a kangaroo cross the road in front of me, or pull over on the side of the road to watch the Magpies & Galahs singing together on a fence post. (I wish I’d caught a shot of that).
I love that only 10 minutes from my suburban home I can be in the bush again.

So this year I’m going to be appreciating this great land that I live in just that bit more.

Sunday, November 7, 2010

PhotoManipulators newsletter October/November 2010

We have some amazing artists in the PhotoManipulators group at RedBubble, and I'm so proud to be able to host the group.
I've just published the latest newsletter, this time I was running a little late, time got away from me, so I made it an October/November combo.
It's full of all the news and goings on from the past 6 weeks so be sure to drop by and take a look.

You can read it here.

Thursday, November 4, 2010

is it time for Christmas Shopping already?


Ooh, I so love a sale! Until the 14th of november we have a magic voucher that will take 15% off my work, and my work only. So if you’re in the mood for putting something of mine in your Christmas stocking now might be the perfect time :)

Just use the code below in the special box at checkout. Enjoy!

scottimages_is_on_sale_3259

Saturday, October 16, 2010

the gift of flight

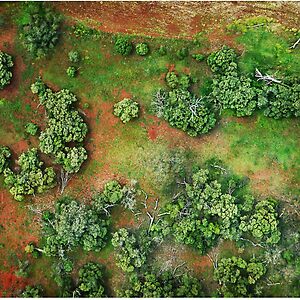
Every 12 months or so I have the great privilege of having a flight in an Australian Army Blackhawk helicopter. For those of us who have family who work in the industry the department is kind enough to let family members have a flight every now and then to familiarise ourselves with what it is they actually do every day.
This year both my young sons were old enough & tall enough to qualify for a flight. I honestly don't think I've ever seen them look so happy - ever!
Their little faces were beaming from ear to ear, and who wouldn't be. A Blackhawk cruises at 250 km per hr, so when you're zipping through the air with the pilot deliberately pulling negative G's with the sole intention of turning stomachs it's pretty much everything a 6 yr old could dream of. It's paradise up there.

So there I was strapped in between my two boys. One with his face painted like a tiger, the other with his face painted like a leopard. They were fearsome indeed. Perhaps I'll show you the photos one day :)
We didn't have a long flight, probably only 5, maybe 7 minutes, but the view was magnificent.
We've suffered from a terribly debilitating drought here on the Darling Downs for the past 10 years or so, but this last winter we've has record rains, and the rains haven't stopped. So now, instead of the usual dry brown that we've become so familiar with, what I saw from my helicopter was vibrant green all around me. Full dams for the first time in years, Farmers have planted their crops and can expect a bumper yield.

So this is one of the images that have come from that flight. Five minutes of fun and inspiration.

Sunday, October 10, 2010

the many faces of he


Every year I put together a photobook of the nicest photos that I’ve managed to shoot of the boys. It’s a nice tangible record of their lives and a great gift for the Grandparents.

For this year I’ve been looking for a shot of Reilly that captures his personality so that I can get a nice big framed print for our wall, but he’s such a poser that I was struggling with what to do.
Today I realised that this larrikin poser is so much a part of his personality, this is him, I really don't have to look any further.

I've never made a polyptych of any sort before, so I've had quite the learning afternoon. I figured that it couldn't be too hard, and determined that it wouldn't be too hard, (positive thinking, I was prepared to try everything).

The hardest part? Trying to decide if I wanted to go with a warm or a cool filter to finish the colours...... settled on cool - 'deep emerald'.

Anyhoo, lots of fun, can't wait to buy a print & see him on my wall.

Saturday, October 9, 2010

a daisy a day


I'm not much of a gardener. In fact if truth be told, I have this incredible, and somewhat uncanny knack for killing almost every piece of plantlife that is entrusted into my care. I wish it weren't so, I really do. I love gardens. I love to be surrounded by the beauty of nature, and the earth, all those gorgeous flowers that I'm constantly poking my camera at... I just can't seem to help them grow.

Having said all that, these little daisies don't appear to need my help. The garden bed in my front yard is laden with them. They're spilling out onto the lawn and are at real risk of taking off down the street if it wasn't for a very keen man that I know with a whippersnipper.

We're also trying very hard to grow a little veggie garden to help our boys learn that plants actually come from the earth not from the supermarket. So far it's doing really well & also seems be resisting my notorious plant history - perhaps they just haven't heard of my reputation yet ;-)


[shot using the TTV technique : Nikon coolpix S8000, vintage kodak duaflex II, weird plastic contraption made from duct tape & a 2 litre ice-cream container, Processed in PS CS5]

Saturday, August 28, 2010

Daffodils


Don't you just love Daffodils? All those smiling golden heads bobbing & swaying in the breeze? They always come at such a wonderful time of the year, when it's still cool and crisp, and the heat hasn't set in..... I'm not one for heat, me.

We've had a terrible Winter of cold and frost and general gloom. This blog has been neglected for eons & I'm even struggling to find the time to take the camera out with me shooting..... not just seasonal winter it seems.

So today I'm taking the boys shopping for seedlings for our vegetable garden, to take advantage of spring but a week away, because the weather is glorious for the first time in a week!

As for my photography, that's at the top of my priorities. There's a weird feeling that grows deep inside when your creativity loses it's it's outlet, & that weird feeling is starting to stir....
So I'll be making more time for being creative - that's my plan :)

Wednesday, October 28, 2009

Photoshop - Working with layers - The Basics

I was recently asked to explain how I use layers in Photoshop. So while trying to put my thoughts together, I decided I might as well share it with everyone who’s interested.

I’ll show how to do very basic adjustments so you get a feel for how layers work. Once you’re comfortable with that you can move on to using layers to create art effects.

Please keep in mind that I’m a Photoshop user... I’m in no way an expert!
This is just my way of working with layers. There are many different ways, & they all work.

Why use layers ? :
Our reasons for using layers are many & varied. We might be doing vector-like illustrations, Or composing an intricate fantasy photomanipulation.
It may be a simple matter of applying text over an image.
You may just want to do basic tone & colour adjustments of your photographs.
Whatever your reason, using layers is almost essential.
I say this for one very important reason. If you apply adjustments of any type to your original image, you will be altering it permanently. There’s no going back. Pixels get moved around & destroyed, every brush or keystroke seriously alters the quality of your image.
However, working in layers is non-destructive. The original image sits at the bottom of your stack, untouched, unaltered, safe from damage.
All of your edits are stacked on top of the original, & then “flattened”, usually upon completion, or when you’re ready to move on to the next stage of editing.

I’ll use this image of a bunch of people looking a Trojan warplane, to demonstrate the basics of using layers.

I’m using PS CS3, & I’m not sure how similar the layout of PS Elements is, so this will either be helpful to you, or just confusing…. it should be fairly similar though.

Let’s get started :

1) Open your image in Photoshop, & save it straight away as a psd (Photoshop file format) I’ve decided to call this one “enter the trojan”.

2) Now have a good look at the image & decide what needs doing.
Does it needs cropping? Some people choose to crop at the start, but for some strange reason I’ll often wait until I’m somewhere through my editing process. I like to wait to see how the image is evolving….

Does anything need cloning out?
This image has a rather annoying person disappearing out of the left side of the frame, so Ill be getting rid of him, as well as cleaning up a few distracting white spots on the airfield in the background.

3) Look to the right of your screen & you’ll see your layers palette.
At the top right of that you’ll see 3 little horizontal lines stacked on top of each other with an arrow next to them. Left click on this & you’ll get a drop-down box. this is your most important box for using layers.

Click on duplicate layer, & rename it as you wish.
I’m calling it “clone”.

You’ll see the duplicate layer appear above the background layer in your layers palette.

Make sure the clone layer is selected (it’ll be highlighted in grey), & you’re ready to work on that layer.
Now select your clone tool & go to work.

All done? If you’re happy with your work make sure you save.

Now, remembering what I said about your background (original) layer remaining untouched, here’s a little demo.
Do you see that little eye beside your “clone” layer?
Click on it…. Hello!! Your cloning has gone! Click on it again….. it’s back!!!
OK, we could have fun with this all day, but do you see how the background image is unchanged? Cool huh?

Let’s move on….

I’ve got blown out highlights in my clouds which are a problem & the mid-tones are a bit too dark.
I’ll deal with the clouds first by using a curves adjustment layer.

4) All the way down at the bottom of your layers palette, you’ll see a toolbar. look for the circle that’s half black & half white.
This is the “create new fill or adjustment layer” button.
Click on it & select “curves”.

5) Grab the little white dot on the line in the top right corner. Now drag it a smidgen down to the right. That should take care of the blown out clouds.
Click OK.

Do you see you now have a curves layer?
(Because I use CS3, it automatically gives me a layer mask box on this layer. It’s that white box in your curves layer. But we’re not going to get into masks today)

Now to fix the mid-tones. For this I’m going to add a Levels layer.
6) Just like in step 4), click on the “create new fill or adjustment layer” button & this time select “Levels”.

7) This will open a box with a levels histogram in it.
To lighten your mid-tones slide the grey arrow in the middle of the histogram to the left until you’re happy.
Click OK, & you’ll see your levels layer sitting above the curves layer.

Now, what if you wanted to do some dodge & burn?
There’s a number of ways to dodge & burn, so I’ll show you one that I use quite often.

8) Remember those 3 little horizontal lines that you clicked on to duplicate the layer? (step 3)
Click on that again, & this time select “New Layer”.

9) In the dialogue box, change the name to “dodge & burn”,
click on the “mode” dropdown box, & select “overlay”,
then check the box “Fill with overlay-neutral color (50% gray)
it should look something like this :

Then click OK.

You’ll now see a layer called “dodge & burn” in your layers palette. It should be on the top of the pile. If it isn’t, simply drag it to the top.
Any work you do to the top layer will be carried over to all the layers below.

10) Select your burn tool, set your range to Shadows, & Exposure around 20 (this will depend completely upon the type of image you’re working on), then get to work burning out the areas that you feel need deepening.

11) Then take your dodge tool, set your Exposure to around 20 & work over the areas that you think need a little more highlighting.

I’ve decided this image needs a bit more saturation.

12) Go back to the black/white circle (as mentioned in step 4), & this time look for Hue/Saturation.

Adjust your sliders as you see fit, then click OK.

At this stage I’m happy with my basic adjustments. It’s now at the stage where it’s ready for me to use it as a background image for something a little more creative.

13) If you haven’t been saving until now, you really must do it now.

14) Now we’re going to Flatten the file.
Go to those 3 little horizontal lines with the arrow again (step 3), & this time look for “Flatten Image”.

Click on it. You’ll see that all your layers have been “flattened into just one layer, & it’s now become your new background layer.

If you’re planning to print this, you’ll need to give it some sharpening.
There are so many ways to sharpen, but at the moment I’m a bit partial to using the “high pass” filter.

15) To do this you’ll need to use a duplicate layer (remember step 3?)
I’m re-naming it “High Pass Sharpening”.

16) Go to your “filter” drop down box on your top tool bar, & select, “other”, “high pass”.

17) Adjust your radius slider until you see a good amount of line detail while keeping the tones in gray. Click OK.

You’re probably wondering what’s happened to your image. We’ll fix that right now.

18) Look above your “high pass” layer, & you’ll see Opacity set at 100%, to the left of that the word “normal” in a drop-down box.
Click on that drop-down box & select “overlay”.

Presto! You’ve got your image back, & it’s been sharpened.
Toggle the “eye” off & on to see the effect.

19) If it’s too sharpened for your taste, you can adjust the opacity of that layer.
Find the “opacity” slider above the layer, & adjust it as you like.
I’m setting this one to 50%.

20) Save this as a new psd file ( I’m calling this one “enter the trojan HP sharp”), & flatten it as before.

21) Now all you need to do is save it in the Format of choice.
I routinely save all my images as TIFF files, & then save again as JPEG.
Remember to do all you backups now so you don’t forget later.

All finished! Now you have an image that is fine as is, or ready for you to get a little creative & do further editing.

The final image :

You might also want to look at Texturing an Image in Photoshop for Absolute Beginners for further editing ideas.

[ One last point : I put a lot of time & effort into creating these tutorials. Please don’t disrespect me by claiming them as your own.]
Monday, August 24, 2009

3 wise monkeys


This is the result of one of those times that your brain wakes you at 2 am to tell you that it’s had a good idea. Then it insists on telling you exactly how to make this idea a reality. I eventually got back to sleep & began following my brain’s instructions soon after breakfast…..

We’re all familiar with those Three Wise Monkeys who together embody the principle of “See no evil, Speak no evil, Hear no evil”.

This principle is commonly regarded to be of Japanese origin, however is most likely to have come to Japan from China in the 8th century.

This is my interpretation of “See no evil, Speak no evil, Hear no evil”.
Credit must go to my son who was very willing to be my model. Apparently it was lots of fun doing the poses!

Wednesday, August 12, 2009

My son turns 5 .... where did the time go?


My son recently turned five years old. A milestone of sorts for him; an enormous one for me! Why? Because I'm wondering where on earth the past five years has gone.
How did my beautiful newborn become a boy full of boisterous energy & cheeky enthusiasm for life?
He was a beautiful baby. Every parent says that, & so they should. But I truly believe he was. We had waited so long for him, there was no way he'd be anything but beautiful.

Nine years of infertility is quite a build-up to the birth of your first child. All the years of thinking that you're not really infertile... "If we just wait a little longer, it might happen."
Of course the years kept ticking by & it didn't happen. It took us a while to accept that IVF was going to be our only chance at parenthood. We eventually made the decision to try IVF. Once the decision was made we didn't waste any more time.
We were lucky with the treatment; we tried it once & it worked. So many others aren't so lucky. We were so relieved to not have to endure all that stress again..... there's a lot of emotional pressure in IVF.

So, after nine years, we found ourselves pregnant; a baby was actually on the way.... YAY!!
He was kind enough to be a troublefree foetus, giving me the opportunity to love every minute of pregnancy.
Birth was much like the pregnancy; a pleasure! five & a half hours of labour, with an epidural for pain relief... as I said, a pleasure.

Once he was born he started growing & hasn't stopped. He has always been taller than his peers, & at five years old, already stands up to my chest. Nipple height to be precise; a fact that he finds highly amusing.
I can only imagine how tall he will be when fully grown.

He's cheeky. Not in one of those rude, bad mannered ways, but cheeky in the mischievous, fun loving sense. He loves to laugh, he loves to tickle, & loves to play tricks.

Perhaps what I love about him the most is his great sensitivity. He's always considerate of the feelings of others, & so giving of his hugs & kisses, kind words... What more could a Mother ask for but to have a son who loves without reserve, who gives of himself without resentment or expectation.

Five years has come around so fast, who knows where it's gone. but the child I see before me is someone that I am so proud of, someone that I love so much, that I look forward to the next fives years with eager anticipation....
though don't come too fast please.